How to point your domain to a simple “Coming soon” page

To set up an “Under Construction” page using cPanel, follow these steps:

Using File Manager:

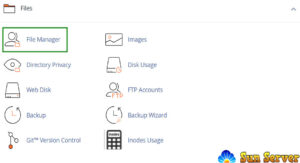
1. Access cPanel and go to the “File Manager” option in the “Files” section.
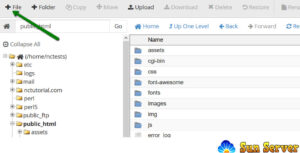
2. Navigate to your domain’s root folder, typically “public_html” for the main domain, and “addondomain.tld” for addon domains. Then, click the “+ File” button to create a new file.
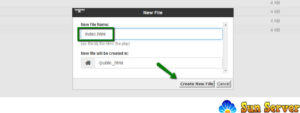
3. Name the new file “index.html” in the “New File Name” field and click the “Create new file” button.
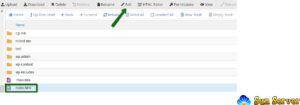
4. Select the newly created “index.html” file and click “Edit.”
5. Copy and paste one of the following messages into the file:

– “This page is under construction. Please come back soon!”
– “We’ll be back soon! Sorry for the inconvenience but we’re performing some maintenance at the moment. If you need to, you can always contact us, otherwise, we’ll be back online shortly. – The Sun ServerTeam”

6. Save the changes.

Using HTML Editor:

1. Log in to cPanel and access the “File Manager” option in the “Files” section.

2. Navigate to your domain’s root folder (usually “public_html” for the main domain or “addondomain.tld” for addon domains), and click the “+ File” button to create a new file.

3. Name the new file “index.html” in the “New File Name” field and click the “Create new file” button.

4. Select the newly created “index.html” file and click “HTML Editor.”

5. Click “Edit.”
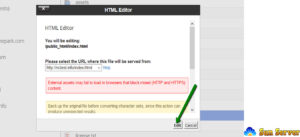
6. Utilize the HTML Editor tools to customize the page:

– Use templates.
– Add form elements like checkboxes, radio buttons, text fields, and buttons.
– Format text, change styles, fonts, highlight text, and adjust colors.
– Insert numbered and bulleted lists.
– Add quotes.
– Insert images.
– Add hyperlinks.

As an example, you can create a simple page using the HTML Editor.
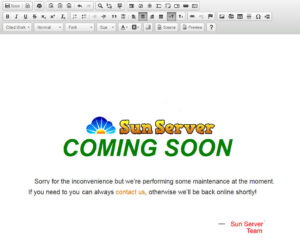
For those who frequently need to create “Coming Soon” pages in WordPress, consider using a dedicated plugin like “Coming Soon & Maintenance Mode.” This plugin offers a comprehensive set of features, making the process of creating coming soon pages faster and more efficient.

That’s it!

I have both hosting and domain(s) with Sun Server. Do I still need to change the nameservers?

For Shared/Business packages on Sun Server, if you register a domain name along with your hosting account order, the DNS settings will be automatically adjusted to our hosting ones.

However, if you want to use PremiumDNS in conjunction with your hosting service, please consult the provided guide.

If you’ve purchased hosting for an existing domain currently using Sun Server BasicDNS or third-party DNS, you’ll need to make the following manual changes:

1. Log in to your Sun Server account (you can find the Sign In option in the header of the page).

2. Choose Domain List from the left sidebar and click on the Manage button next to your domain.

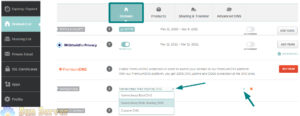
3. Locate the Nameservers section and select Sun Server Web Hosting DNS from the drop-down menu to point your domain to our shared hosting nameservers:

– dns1.sunserverhosting.com
– dns2.sunserverhosting.com

Please note that when you change the nameservers, any custom DNS records for your domain will be overwritten with our hosting ones. You can recreate them in your cPanel Zone Editor and Email Routing menu, where you can manage your domain’s email settings.

Ensure that you click the save icon to preserve these changes.

Note: Reseller, VPS, and Dedicated server Hosting customers should follow the DNS settings provided in their hosting welcome emails instead of using the above procedure.

It’s important to be aware that once you change the nameservers, these modifications won’t propagate instantaneously worldwide. It may take up to 24 hours (and sometimes more in rare cases) for local Internet Service Providers (ISPs) to update their DNS caches, allowing everyone to access your website.

Do you offer White Label hosting?

White-label hosting is a service offered by a company that allows other parties to repackage it under their own brand, concealing any affiliation with the original company. This is especially valuable if you intend to resell our hosting services.

In certain hosting solutions, we include white-label marketing tools. If you opt for our Reseller hosting, VPS, or Dedicated server options, you won’t find any mention of Sun Server or our logo. Your branding and identity will take precedence.

With any of the aforementioned hosting services, you can even customize the cPanel logo for your clients using your own branding in WHM’s cPanel Branding tool.

Additionally, you have the ability to register private nameservers to offer your clients. This means your customers can use your custom DNS records to direct their domain names to your hosting account.

Once the Sun Server Private Email subscription expires, it enters a grace period and remains in that state for 30 days. During this time, access to mailboxes and the ability to send and receive emails is not possible.

However, you can reactivate the subscription at the regular renewal price, and no data will be lost.

Subscriptions in active and grace states can be renewed as usual, following the guidelines provided here.

If a subscription is not renewed during the grace period, it enters the redemption state. In this state, you can only reinstate the subscription at the regular renewal rate by contacting support. Only mailboxes and emails will be restored; contacts, tasks, and files cannot be recovered from this state.

Should the subscription not be reinstated during the redemption period (30 days), the NC Private Email subscription will be canceled. It will be removed from the server, and all data will be lost.

You can check which subscriptions require renewal in your Sun Server account in the “Expiring Soon” section.

How to Create An Email Account in cPanel

To create a new email account within cPanel, follow these steps:

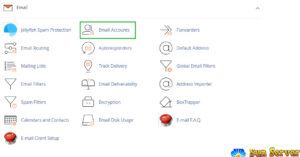
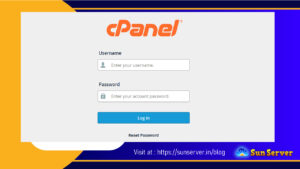
1. Begin by logging into your cPanel. Then, navigate to the “Mail” section and select the “Email Accounts” menu. You can also access the Email Accounts menu conveniently through cPanel Shortcuts within your Sun Server account.

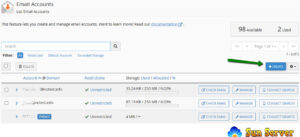
2. Next, click on the “+Create” button.

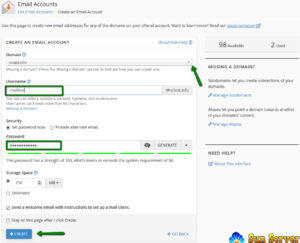
3. If you have multiple domains, choose the domain you wish to associate with your email account from the dropdown list in the top right corner. Then, enter your desired email address. At this stage, you have the option to set the password immediately or provide an alternate email address. If you choose the latter, the system will send an email containing a password configuration link, as well as notifications and password reset emails. Once you’ve configured these settings, click on “+Create.”


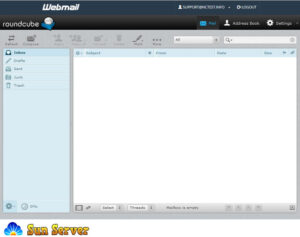
4. To access webmail, click on “Check Email” next to the email account you’ve created.

5. You have the freedom to select your preferred webmail interface. One option is the Roundcube webmail interface. Additionally, you can directly access cPanel webmail in your browser using one of the following links:
– https://yourdomain.com:2096
– https://yourdomain.com/webmail
– http://webmail.yourdomain.com

NOTE: If you use the link http://webmail.yourdomain.com to access cPanel webmail, you may encounter a ‘broken’ interface when accessing the Horde webmail client. This is because the proxy link uses port 80 to connect, while the default cPanel configuration for these clients is set to port 81. This mismatch could result in a connection error or a corrupted webmail display.

That’s the complete process!

How to set up Zoho email for a domain hosted with Sun Server?

If you wish to connect your domain hosted on a Sun Server to your Zoho email, this article is tailored to your needs!

Zoho Mail Suite offers robust Email Hosting features suitable for various types and sizes of organizations. The setup process is straightforward, allowing you to create custom domain-based email addresses for all members of your organization without any downtime.

To configure Zoho Mail:

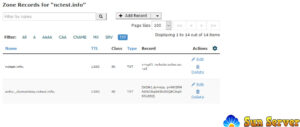
1. Log in to your cPanel account and access the Zone editor menu:

For the cPanel Basic Theme:


For the cPanel Retro Theme:

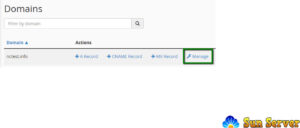
Once there, click on the Manage button next to the domain for which you want to set up Zoho Mail.

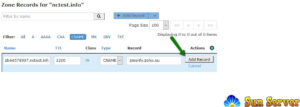
Choose the Add Record >> CNAME type and paste the code generated in the Zoho Control Panel into the Name field. In the Record field, enter the value provided by Zoho, e.g., zmverify.zoho.eu, and then add the record.

For the cPanel Basic Theme:

For the cPanel Retro Theme:

After the domain is verified, you’ll need to create MX Records to link the domain to the mail service.

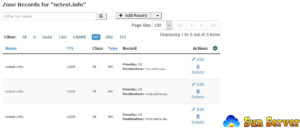
In the same Zone editor menu, click on the Add Record button and select MX records type. Add the following records:

Name Priority Destination
domain.com 10 mx.zoho.eu
domain.com 20 mx2.zoho.eu
domain.com 50 mx3.zoho.eu

NOTE: Depending on the data center location (US/UK/CN), the MX record values may vary for your domain. The correct MX records specific to your domain can be found in the Admin Control Panel.

For the cPanel Basic Theme:

For the cPanel Retro Theme:

These changes typically take about 30 minutes to take effect.

NOTE: The provided MX values are based on general configuration information. For domain-specific configuration, refer to your Admin Control Panel.

You may also need to configure the DKIM and SPF records, which can be set up in your Zoho Control Panel.

To add these records, choose the TXT record as the record type, enter your domain name in the Name field, and input v=spf1 include:zoho.eu -all in the Record field.

Click on Add Record >> TXT type again, enter zoho._domainkey.domain.eu into the Name field (if ‘zoho’ was specified as the selector in the Zoho Control Panel), and insert the corresponding value of the DKIM record, which you copied from the TXT record value field in your Zoho account, into the Record field.

For the cPanel Basic Theme:

For the cPanel Retro Theme:

These changes will take effect within 30 minutes.

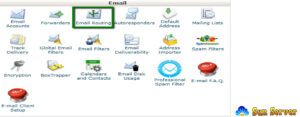
To complete the Zoho Mail setup, you should change the Email Exchanger for the domain in question. Within your cPanel account, go to the Email Routing menu under the Email section:

For the cPanel Basic Theme:

For the cPanel Retro Theme:

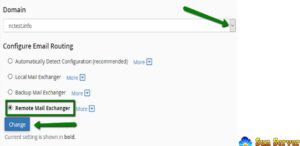
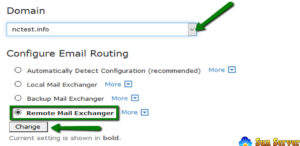
Select your domain from the drop-down menu, choose the Remote Mail Exchanger option, and click the Change button.

For the cPanel Basic Theme:

For the cPanel Retro Theme:

That’s it!
How do I disable Domain Privacy service for my domain?

To deactivate the Domain Privacy service for your domain, please follow the steps outlined below:

1. Log in to your Sun Server account.

2. Navigate to the Domain List in the left sidebar and click on the Manage button adjacent to your domain:

3. Switch off the Protection option located next to Domain Privacy to disable this service:

That’s all there is to it!

Even if you’ve opted not to utilize our Domain Privacy service, you might want to explore Domain Vault, which represents our most advanced domain security solution to date.

What is Domain Privacy?

Domain Privacy, offered by Withheld for Privacy, is a service designed to safeguard your personal information in the Whois database. It shields your name, address, phone number, and email from being visible to individuals conducting Whois searches on your domain. Instead, it substitutes its own contact details in the public Whois record to shield you from possible spam and the risks of identity theft.

For heightened security measures for your domain, explore Domain Vault, which provides plans to enhance the protection of any domain.

What is Whois?

Whois is a service that offers fundamental information about a registered domain, including details about the domain owner, the domain’s availability status, and the Registrar responsible for its registration. It also provides crucial information such as the domain’s registration and expiration dates, along with the nameservers it uses.

ICANN regulations mandate that all domain Registrants maintain accurate and up-to-date contact information to enhance security and mitigate the risk of fraud and identity theft. For more in-depth information about Whois, you can refer to this page.

We provide a Whois Lookup option that allows you to retrieve information associated with a domain. The information available through this lookup varies depending on the specific domain Registry to some extent.

For most generic top-level domains (gTLDs) and new gTLDs, you can expect to find details about the domain’s registrant, registration and expiration dates, and DNS hosting location. However, for most country code top-level domains (ccTLDs), you may need to visit the Registry’s website to access more comprehensive information.

The level of information accessible in a Whois record is contingent on the top-level domain type and the Registrar responsible for managing the domain.

Domain Registrars typically allow their customers to update their domain contact information directly from their accounts, eliminating the need to contact the Registrar’s customer support. Please note that updates to Whois information may take up to 24 hours to propagate.

Some domain Registries offer the option for domain owners to shield certain details in their public Whois records. This is achieved by substituting the Registrant’s data with that of the Registrar or hosting company.

This privacy feature is commonly known as Domain Privacy Protection or domain privacy. For instance, in a user’s public Whois record with domain protection enabled, their personal email address is replaced with an encrypted string like a7b594eb9f5d43c123123c82484363f81.protect@withheldforprivacy.com.

If someone wishes to contact the user, they can send an email to this address, which will be securely redirected to the user’s personal email address.

How to log in to WordPress using Softaculous

Softaculous simplifies the installation and management of WordPress with just a few clicks, offering not only ease of program installation but also significant time-saving benefits through automated software installation tasks. This guide will walk you through the process of accessing a website’s dashboard using Softaculous.

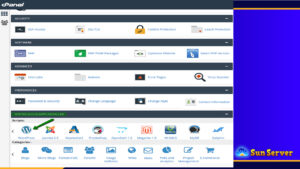
  1. Begin by logging into your cPanel account.
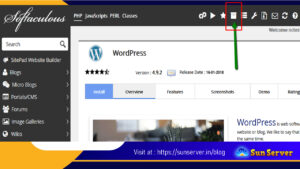
  2. Scroll down to the bottom of the page and locate the ‘Softaculous App Installer’ section, then click on the WordPress icon.
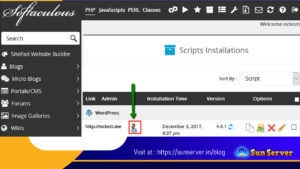
  3. Navigate to the ‘All Installations’ menu.
  4. When dealing with a content management system (CMS), you’ll typically need to log in as an Administrator. To proceed, simply click on the ‘Admin’ icon.

You’re now logged in and ready to manage your website effortlessly!