Our Company Is Located At :
Sun Infosoft India, 537/108, Sun Tower, Baldeobagh, Jabalpur, Madhya Pradesh 482002
Mr. Ram Murty Sharma
(CEO)
Our Company Is Located At :
Sun Infosoft India, 537/108, Sun Tower, Baldeobagh, Jabalpur, Madhya Pradesh 482002
Mr. Ram Murty Sharma
(CEO)
Establishing a strong online presence through branding is crucial for any business. The more frequently your company’s brand is visible, the more it becomes ingrained in the minds of your customers.
In this article, we will guide you on how to replace the default WHMCS logo with your own logo.
WHMCS, short for WHM Complete Solution, is a highly popular comprehensive client management, billing, and support system tailored for hosting reseller businesses. The WHMCS client area is designed to be customizable, allowing you to modify the visual appearance of your entire interface. WHMCS utilizes the powerful Smarty template system, making it easy to personalize the layout.
By default, the WHMCS Client Area has this appearance:
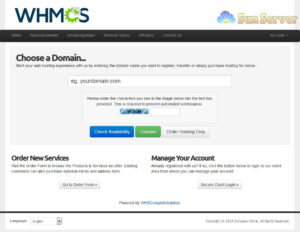
Of course, you’d prefer your customers to see your company logo in this space. The process of changing the logo is straightforward and involves a few simple steps:
1. Access your cPanel and navigate to the directory where WHMCS is installed.
2. Open the “assets” folder.
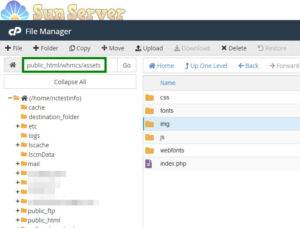
3. Inside the “assets” folder, locate the “img” folder and find the “whmcs.png” file within it.
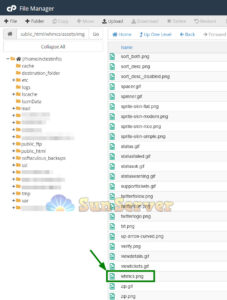
4. Now, you need to upload your custom logo file to this directory and rename it as “whmcs.png.” You can also rename the original file to something like “whmcs_old.png.”
5. Be sure to adjust the image size *before* uploading it to ensure the best logo scaling. You might opt for a logo with a transparent background for seamless integration with the header background.
6. Refresh the WHMCS client portal to view your new logo:
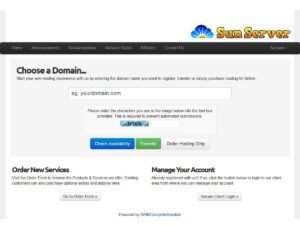
End of Blog
Affiliate Membership is at the sole discretion of Sun Server. The factors that we consider are as follows:
Affiliates must have:
1. An active website. To be considered “Active”, the website must have an established presence on the web as determined by organic search ranking, traffic to website, and/or industry reputation.
2. Aligned content. The website content must be aligned with our marketplace and target customers (i.e., domain, security, hosting, etc.).
3. Domain registration. The website must be directly registered via your own domain name and not via a 3rd-party vendor (i.e., Squarespace or WordPress).
4. Marketing alignment. Marketing strategy and tactics that are aligned and complementary to Sunserver’s marketing efforts (i.e., social media, web content, advertising, email, loyalty programs, etc.)
5. Legal Compliance. Compliance with all US laws, all laws relevant to your home country, and the rules of our Affiliate Program Terms.
Affiliate Membership criteria is an ongoing obligation and membership may be reviewed and/or revoked at any time.
NOTE: You should whitelist at least one IP before your API access begin to work. Please keep in mind that only IPv4 addresses can be used.
That’s it!
To set up an “Under Construction” page using cPanel, follow these steps:
Using File Manager:
1. Access cPanel and go to the “File Manager” option in the “Files” section.
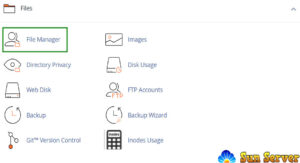
2. Navigate to your domain’s root folder, typically “public_html” for the main domain, and “addondomain.tld” for addon domains. Then, click the “+ File” button to create a new file.
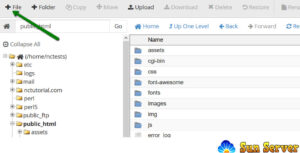
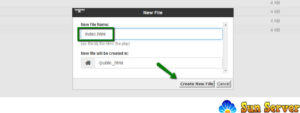
3. Name the new file “index.html” in the “New File Name” field and click the “Create new file” button.
4. Select the newly created “index.html” file and click “Edit.”
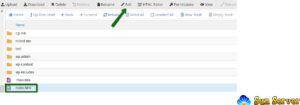
5. Copy and paste one of the following messages into the file:
– “This page is under construction. Please come back soon!”
– “We’ll be back soon! Sorry for the inconvenience but we’re performing some maintenance at the moment. If you need to, you can always contact us, otherwise, we’ll be back online shortly. – The Sun ServerTeam”
6. Save the changes.
Using HTML Editor:
1. Log in to cPanel and access the “File Manager” option in the “Files” section.

2. Navigate to your domain’s root folder (usually “public_html” for the main domain or “addondomain.tld” for addon domains), and click the “+ File” button to create a new file.

3. Name the new file “index.html” in the “New File Name” field and click the “Create new file” button.

4. Select the newly created “index.html” file and click “HTML Editor.”

5. Click “Edit.”
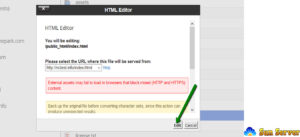
6. Utilize the HTML Editor tools to customize the page:
– Use templates.
– Add form elements like checkboxes, radio buttons, text fields, and buttons.
– Format text, change styles, fonts, highlight text, and adjust colors.
– Insert numbered and bulleted lists.
– Add quotes.
– Insert images.
– Add hyperlinks.
As an example, you can create a simple page using the HTML Editor.
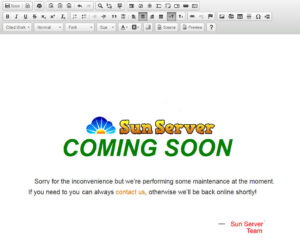
For those who frequently need to create “Coming Soon” pages in WordPress, consider using a dedicated plugin like “Coming Soon & Maintenance Mode.” This plugin offers a comprehensive set of features, making the process of creating coming soon pages faster and more efficient.
That’s it!
For Shared/Business packages on Sun Server, if you register a domain name along with your hosting account order, the DNS settings will be automatically adjusted to our hosting ones.
However, if you want to use PremiumDNS in conjunction with your hosting service, please consult the provided guide.
If you’ve purchased hosting for an existing domain currently using Sun Server BasicDNS or third-party DNS, you’ll need to make the following manual changes:
1. Log in to your Sun Server account (you can find the Sign In option in the header of the page).
2. Choose Domain List from the left sidebar and click on the Manage button next to your domain.

3. Locate the Nameservers section and select Sun Server Web Hosting DNS from the drop-down menu to point your domain to our shared hosting nameservers:
– dns1.sunserverhosting.com
– dns2.sunserverhosting.com
Please note that when you change the nameservers, any custom DNS records for your domain will be overwritten with our hosting ones. You can recreate them in your cPanel Zone Editor and Email Routing menu, where you can manage your domain’s email settings.
Ensure that you click the save icon to preserve these changes.
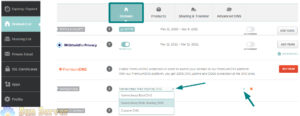
Note: Reseller, VPS, and Dedicated server Hosting customers should follow the DNS settings provided in their hosting welcome emails instead of using the above procedure.
It’s important to be aware that once you change the nameservers, these modifications won’t propagate instantaneously worldwide. It may take up to 24 hours (and sometimes more in rare cases) for local Internet Service Providers (ISPs) to update their DNS caches, allowing everyone to access your website.
White-label hosting is a service offered by a company that allows other parties to repackage it under their own brand, concealing any affiliation with the original company. This is especially valuable if you intend to resell our hosting services.
In certain hosting solutions, we include white-label marketing tools. If you opt for our Reseller hosting, VPS, or Dedicated server options, you won’t find any mention of Sun Server or our logo. Your branding and identity will take precedence.
With any of the aforementioned hosting services, you can even customize the cPanel logo for your clients using your own branding in WHM’s cPanel Branding tool.
Additionally, you have the ability to register private nameservers to offer your clients. This means your customers can use your custom DNS records to direct their domain names to your hosting account.
Once the Sun Server Private Email subscription expires, it enters a grace period and remains in that state for 30 days. During this time, access to mailboxes and the ability to send and receive emails is not possible.
However, you can reactivate the subscription at the regular renewal price, and no data will be lost.
Subscriptions in active and grace states can be renewed as usual, following the guidelines provided here.
If a subscription is not renewed during the grace period, it enters the redemption state. In this state, you can only reinstate the subscription at the regular renewal rate by contacting support. Only mailboxes and emails will be restored; contacts, tasks, and files cannot be recovered from this state.
Should the subscription not be reinstated during the redemption period (30 days), the NC Private Email subscription will be canceled. It will be removed from the server, and all data will be lost.
You can check which subscriptions require renewal in your Sun Server account in the “Expiring Soon” section.
To create a new email account within cPanel, follow these steps:
1. Begin by logging into your cPanel. Then, navigate to the “Mail” section and select the “Email Accounts” menu. You can also access the Email Accounts menu conveniently through cPanel Shortcuts within your Sun Server account.
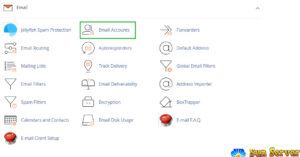
2. Next, click on the “+Create” button.
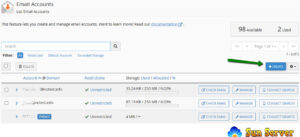
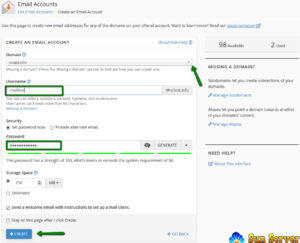
3. If you have multiple domains, choose the domain you wish to associate with your email account from the dropdown list in the top right corner. Then, enter your desired email address. At this stage, you have the option to set the password immediately or provide an alternate email address. If you choose the latter, the system will send an email containing a password configuration link, as well as notifications and password reset emails. Once you’ve configured these settings, click on “+Create.”
4. To access webmail, click on “Check Email” next to the email account you’ve created.

5. You have the freedom to select your preferred webmail interface. One option is the Roundcube webmail interface. Additionally, you can directly access cPanel webmail in your browser using one of the following links:
– https://yourdomain.com:2096
– https://yourdomain.com/webmail
– http://webmail.yourdomain.com
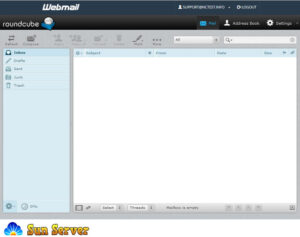
NOTE: If you use the link http://webmail.yourdomain.com to access cPanel webmail, you may encounter a ‘broken’ interface when accessing the Horde webmail client. This is because the proxy link uses port 80 to connect, while the default cPanel configuration for these clients is set to port 81. This mismatch could result in a connection error or a corrupted webmail display.
That’s the complete process!
If you wish to connect your domain hosted on a Sun Server to your Zoho email, this article is tailored to your needs!
Zoho Mail Suite offers robust Email Hosting features suitable for various types and sizes of organizations. The setup process is straightforward, allowing you to create custom domain-based email addresses for all members of your organization without any downtime.
To configure Zoho Mail:
1. Log in to your cPanel account and access the Zone editor menu:
For the cPanel Basic Theme:

For the cPanel Retro Theme:

Once there, click on the Manage button next to the domain for which you want to set up Zoho Mail.
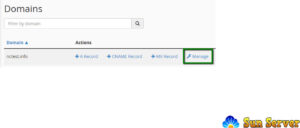
Choose the Add Record >> CNAME type and paste the code generated in the Zoho Control Panel into the Name field. In the Record field, enter the value provided by Zoho, e.g., zmverify.zoho.eu, and then add the record.
For the cPanel Basic Theme:

For the cPanel Retro Theme:
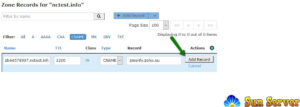
After the domain is verified, you’ll need to create MX Records to link the domain to the mail service.
In the same Zone editor menu, click on the Add Record button and select MX records type. Add the following records:
Name Priority Destination
domain.com 10 mx.zoho.eu
domain.com 20 mx2.zoho.eu
domain.com 50 mx3.zoho.eu
NOTE: Depending on the data center location (US/UK/CN), the MX record values may vary for your domain. The correct MX records specific to your domain can be found in the Admin Control Panel.
For the cPanel Basic Theme:

For the cPanel Retro Theme:
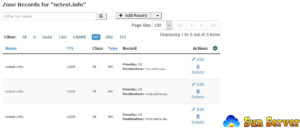
These changes typically take about 30 minutes to take effect.
NOTE: The provided MX values are based on general configuration information. For domain-specific configuration, refer to your Admin Control Panel.
You may also need to configure the DKIM and SPF records, which can be set up in your Zoho Control Panel.
To add these records, choose the TXT record as the record type, enter your domain name in the Name field, and input v=spf1 include:zoho.eu -all in the Record field.
Click on Add Record >> TXT type again, enter zoho._domainkey.domain.eu into the Name field (if ‘zoho’ was specified as the selector in the Zoho Control Panel), and insert the corresponding value of the DKIM record, which you copied from the TXT record value field in your Zoho account, into the Record field.
For the cPanel Basic Theme:

For the cPanel Retro Theme:
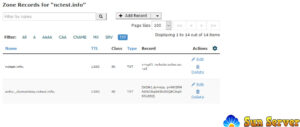
These changes will take effect within 30 minutes.
To complete the Zoho Mail setup, you should change the Email Exchanger for the domain in question. Within your cPanel account, go to the Email Routing menu under the Email section:
For the cPanel Basic Theme:

For the cPanel Retro Theme:
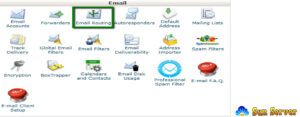
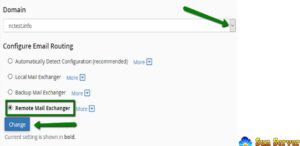
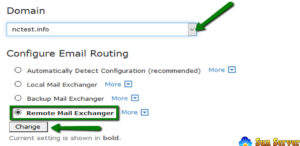
Select your domain from the drop-down menu, choose the Remote Mail Exchanger option, and click the Change button.
For the cPanel Basic Theme:
For the cPanel Retro Theme:
That’s it!