How do I disable Domain Privacy service for my domain?

To deactivate the Domain Privacy service for your domain, please follow the steps outlined below:

1. Log in to your Sun Server account.

2. Navigate to the Domain List in the left sidebar and click on the Manage button adjacent to your domain:

3. Switch off the Protection option located next to Domain Privacy to disable this service:

That’s all there is to it!

Even if you’ve opted not to utilize our Domain Privacy service, you might want to explore Domain Vault, which represents our most advanced domain security solution to date.

What is Domain Privacy?

Domain Privacy, offered by Withheld for Privacy, is a service designed to safeguard your personal information in the Whois database. It shields your name, address, phone number, and email from being visible to individuals conducting Whois searches on your domain. Instead, it substitutes its own contact details in the public Whois record to shield you from possible spam and the risks of identity theft.

For heightened security measures for your domain, explore Domain Vault, which provides plans to enhance the protection of any domain.

What is Whois?

Whois is a service that offers fundamental information about a registered domain, including details about the domain owner, the domain’s availability status, and the Registrar responsible for its registration. It also provides crucial information such as the domain’s registration and expiration dates, along with the nameservers it uses.

ICANN regulations mandate that all domain Registrants maintain accurate and up-to-date contact information to enhance security and mitigate the risk of fraud and identity theft. For more in-depth information about Whois, you can refer to this page.

We provide a Whois Lookup option that allows you to retrieve information associated with a domain. The information available through this lookup varies depending on the specific domain Registry to some extent.

For most generic top-level domains (gTLDs) and new gTLDs, you can expect to find details about the domain’s registrant, registration and expiration dates, and DNS hosting location. However, for most country code top-level domains (ccTLDs), you may need to visit the Registry’s website to access more comprehensive information.

The level of information accessible in a Whois record is contingent on the top-level domain type and the Registrar responsible for managing the domain.

Domain Registrars typically allow their customers to update their domain contact information directly from their accounts, eliminating the need to contact the Registrar’s customer support. Please note that updates to Whois information may take up to 24 hours to propagate.

Some domain Registries offer the option for domain owners to shield certain details in their public Whois records. This is achieved by substituting the Registrant’s data with that of the Registrar or hosting company.

This privacy feature is commonly known as Domain Privacy Protection or domain privacy. For instance, in a user’s public Whois record with domain protection enabled, their personal email address is replaced with an encrypted string like a7b594eb9f5d43c123123c82484363f81.protect@withheldforprivacy.com.

If someone wishes to contact the user, they can send an email to this address, which will be securely redirected to the user’s personal email address.

How to log in to WordPress using Softaculous

Softaculous simplifies the installation and management of WordPress with just a few clicks, offering not only ease of program installation but also significant time-saving benefits through automated software installation tasks. This guide will walk you through the process of accessing a website’s dashboard using Softaculous.

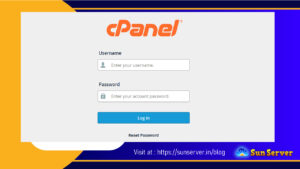
  1. Begin by logging into your cPanel account.
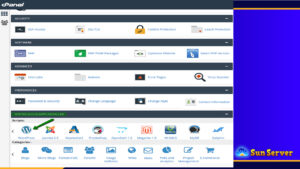
  2. Scroll down to the bottom of the page and locate the ‘Softaculous App Installer’ section, then click on the WordPress icon.
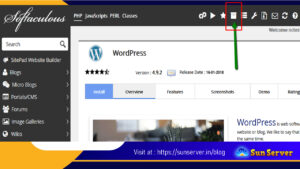
  3. Navigate to the ‘All Installations’ menu.
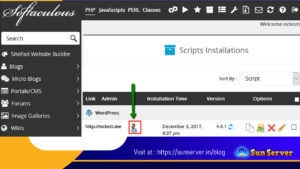
  4. When dealing with a content management system (CMS), you’ll typically need to log in as an Administrator. To proceed, simply click on the ‘Admin’ icon.

You’re now logged in and ready to manage your website effortlessly!

How to manage plugins in WordPress

A plugin is a software component designed to expand the capabilities and features of a program. It provides various custom functions, enabling users to enhance the software’s flexibility and tailor it to their specific requirements. WordPress users can access a wide variety of plugins, including numerous free options in the Official WordPress Plugin Directory.

Please note: Prior to making any changes, it is crucial to create a complete backup of your website.

Installing a Plugin

There are two methods for installing a plugin in WordPress: automatic installation from the WordPress Admin Dashboard and manual installation from a .zip archive.

Automatic Installation

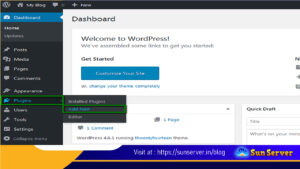
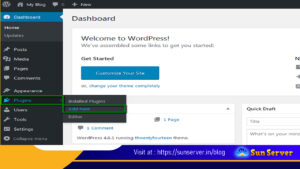
1. Log in to your WordPress Admin Dashboard (you can use cPanel Shortcuts for quick access) and navigate to the Plugins menu on the left, then click “Add New”
Sunserver WordPress 1

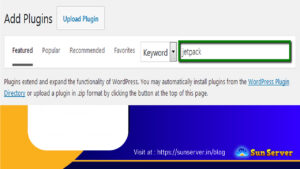
2. In the search bar, you can enter the plugin’s name, author, or a descriptive keyword to find the desired plugin.

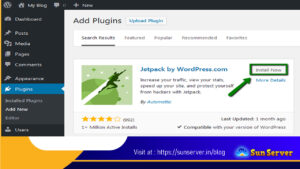
3. A list of plugins matching your search criteria will be displayed. You can click on “More Details” to access additional information and setup instructions. To install the plugin, click “Install Now.”

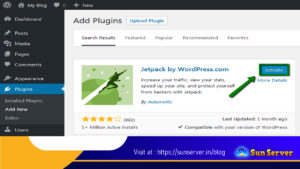
4. Once the plugin is installed, you will receive a notification. Click “Activate” to proceed.

**Manual Installation**

Manual installation is required when you want more control over the plugin installation process or if you’ve acquired a plugin from a third-party source. Here are the steps for manually installing and activating a plugin in .zip format:

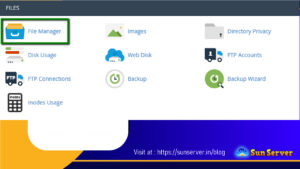
1. Log in to your cPanel and access the File Manager.

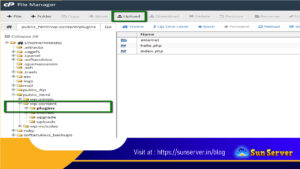
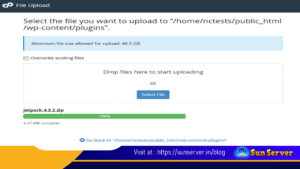
2. Navigate to the /wp-content/plugins directory and click the “Upload” button to upload the .zip file from your local machine. Alternatively, you can use FTP for this.

3. After uploading the archive, right-click on the zipped file and select “Extract.”

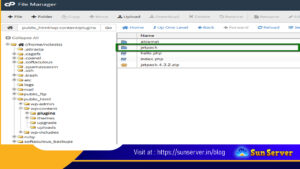
4. Once the archive is extracted, you’ll find the plugin folder in your WordPress installation directory.

5. The plugin is now installed and can be activated in your Dashboard under “Plugins.”

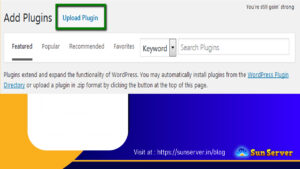
6. Alternatively, you can use the “Upload Plugin” option in the WordPress Dashboard.

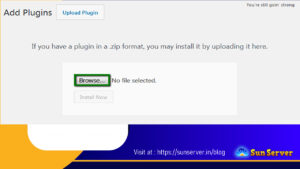
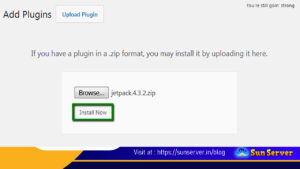
7. Click “Browse” and select the .zip format plugin file from your local machine. Then click “Install Now.”

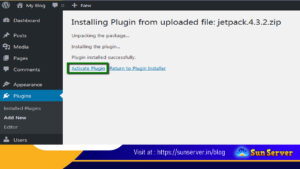
8. Once installed, you will receive a notification confirming the successful installation from the uploaded file. From the same page, you can click “Activate Plugin.”

Activating a Plugin

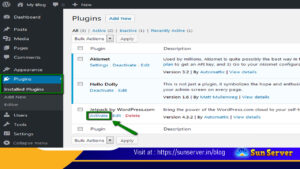
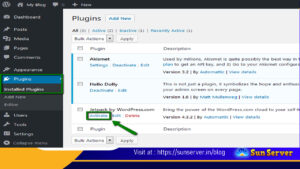
To activate an installed plugin, go to your WordPress Dashboard, access the “Plugins” menu, then “Installed Plugins,” and click on the “Activate” button.

Removing a Plugin

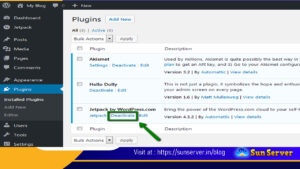
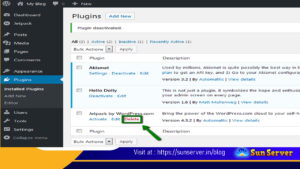
1. If you want to uninstall a plugin, first click “Deactivate.” After deactivating, the “Delete” button will become visible.

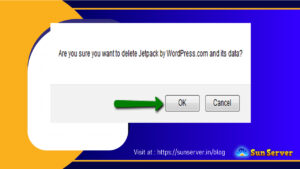
2. A notification will appear, asking you to confirm whether you want to delete the plugin and its associated files or cancel the removal.

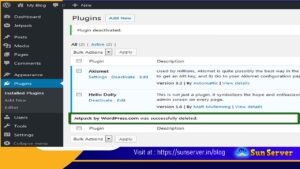
3. Once the plugin is removed, you will receive a notification that it has been deleted from your account, and the plugin folder will be automatically removed from the /wp-content/plugins directory.

That’s all there is to it!

What is hotlinking and how to prevent it

Hotlinking is a process in which someone directly links to media files (such as images, videos, or audio) rather than viewing them within the context of a full website page where they are originally hosted.

Here’s why hotlinking should be a concern:

1. Copyright Infringement: Hotlinking can be considered a copyright infringement since it often displays media without proper attribution to the original author or source.

2. Bandwidth Usage: Hotlinking consumes the resources, particularly bandwidth, of the hosting account where the content is hosted, potentially causing strain on the server.

To determine if your images are being hotlinked, you can use a straightforward method involving Google Images. Enter the following command in the search bar:

“`
inurl:yourdomain.com -site:yourdomain.com
“`

Replace “yourdomain.com” with your actual domain. This search reveals all image links associated with your website, excluding legitimate ones you own, leaving only hotlinked URLs.

Hotlink protection does not adversely affect your website’s SEO ranking. In fact, it can improve loading times by reducing the strain on your bandwidth due to unauthorized image requests. However, issues can arise if hotlink protection blocks access for search engine crawlers, leading to images not appearing in search results or the website not being properly indexed. To avoid this, use hotlink protection rules or plugins that allow blank referrers and search engines as authorized fetchers for image URLs.

To prevent hotlinking in cPanel, you can utilize the “Hotlink Protection” menu specifically designed for this purpose. There are also plugins available for WordPress, such as “All In One WP Security And Firewall,” which can offer hotlink protection. When using such plugins, it’s advisable to back up your account before making any changes. Clearing the cache in a caching plugin after enabling hotlink protection is another useful step.

For a general solution, you can block hotlinking by editing the .htaccess file in the root folder of the relevant domain. This method prevents the use of direct URLs to files without blocking them from being displayed on the original website. Use the following rule in the .htaccess file:

“`
RewriteEngine on
RewriteCond %{HTTP_REFERER} !^http(s)?://(www\.)?yourdomain.com [NC]
RewriteRule \.(jpg|jpeg|png|gif)$ – [NC,F,L]
“`

Replace “yourdomain.com” with your website name, and “jpg|jpeg|png|gif” specifies the file types to protect.

For a customized error page when hotlinking is blocked, modify the rule to specify the error image to be displayed:

“`
RewriteEngine on
RewriteCond %{HTTP_REFERER} !^$
RewriteCond %{HTTP_REFERER} !^http://(www\.)?yourdomain.com/.*$ [NC]
RewriteRule \.(jpg|jpeg|png|gif)$ http://domain.com/nohotlinking.jpg [NC,R,L]
“`

In the above rule, “http://domain.com/nohotlinking.jpg” is the direct link to the customized error image.

To allow certain search engines and social media platforms to access your files, you can add special lines to the hotlink protection rule in the .htaccess file to whitelist them:

“`
RewriteEngine on
RewriteCond %{HTTP_REFERER} !^$
RewriteCond %{HTTP_REFERER} !^http(s)?://(www\.)?yourdomain.com [NC]
RewriteCond %{HTTP_REFERER} !^http(s)?://(www\.)?google.com [NC]
RewriteCond %{HTTP_REFERER} !^http(s)?://(www\.)?bing.com [NC]
RewriteCond %{HTTP_REFERER} !^http(s)?://(www\.)?yahoo.com [NC]
RewriteRule \.(jpg|jpeg|png|gif)$ http://domain.com/nohotlinking.jpg [NC,R,L]
“`

In the above rule, “yourdomain.com” should be replaced with your website name, and “jpg|jpeg|png|gif” specifies the file types to protect. Additional lines can be added to whitelist more websites as needed.

In conclusion, implementing hotlink protection safeguards your bandwidth and ensures stable website performance while still allowing certain search engines and platforms to access your files for search results and sharing.

What is CloudLinux?

CloudLinux is a Linux distribution primarily tailored for hosting environments, and it’s built upon the CentOS operating system. It leverages LVE (Lightweight Virtual Environment) kernel technology, which bears some similarities to OpenVZ and other OS-based virtualization methods.

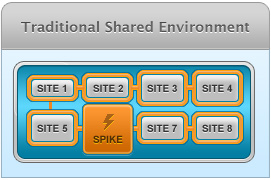
In the context of shared hosting, one of the most common causes of downtime is a single user account monopolizing a significant portion of the shared resources due to resource-intensive websites or unoptimized scripts. CloudLinux OS addresses this issue by creating an environment where it’s virtually impossible for one or a few users to overload or hang the server.

The core concept of CloudLinux is to enhance server stability by isolating each client within a secure and separate environment, often referred to as a ‘container.’ This isolation limits the amount of resources each user can utilize.

Furthermore, CloudLinux incorporates CageFS, a virtualized file system along with a set of tools designed to confine each user within their own ‘cage.’ Each customer has their individual CageFS with all necessary system files and tools.

Here are the advantages of CageFS:

1. Users can only access safe binaries.
2. Users cannot discover the presence or usernames of other users on the server.
3. Users cannot view server configuration files, such as Apache config files.
4. Users have a restricted view of the /proc file system and cannot monitor other users’ processes.
5. CageFS confines the execution of scripts, preventing malware in one cPanel account from affecting others.

The benefits of CloudLinux include:

1. Isolation of users to prevent resource-related issues among neighbors.
2. Users cannot access sensitive configuration files or private data.
3. Monitoring and control of resource limits, including CPU, RAM, and I/O usage.
4. Monitoring and management of MySQL usage.
5. Provision of the CageFS file system for unique encapsulation of each customer.
6. End users can select from various PHP versions.
7. Protection against symbolic link attacks.
8. Compatibility with all major control panels.

In summary, CloudLinux and its CageFS component are powerful tools that enhance the stability and security of hosting environments, ensuring that users have a reliable and secure experience while sharing server resources.

Hosting migration to Sunserver

We want to guide you through the process of migrating your hosting to SunServer, making it as seamless and stress-free as possible. Our experienced migration team is here to assist you at every step, and the best part is that we offer this service free of charge!

We can help you with various types of migrations, including:

1. Migrating from any cPanel-based provider to our shared hosting.
2. Migrating from any cPanel-based provider to our reseller hosting.
3. Migrating from a cPanel-based VPS to one of our VPS options.
4. Migrating from a cPanel-based Dedicated server to one of our Dedicated server offerings.
5. Migration from non-cPanel providers (e.g., GoDaddy) to SunServer.

Here’s how we can assist you:

**Full cPanel Transfers:**
– For Shared Hosting: We will transfer your cPanel hosting account as is to a Shared account with us. It should meet the limits set by your new SunServer hosting plan, including the number of hosted domains, email accounts, and MySQL databases. We’ll ensure compatibility with our services and PHP/CMS versions. Your current provider should generate a full cPanel backup for the transfer.

– For Reseller Hosting: We can fully migrate your Reseller hosting plan to SunServer servers. Our team will move all accounts, scan for viruses, provide site check logs, and instruct you on changing the nameservers.

– For VPS/Dedicated Servers: We can seamlessly transfer your VPS/Dedicated server, especially if you order a VPS or Dedicated server with Basic or Complete management.

**Assistance with Manual Transfers:**
– Manual transfers can be more challenging and require technical skills. Our Transfer Assistance team will review each case individually and provide you with the necessary guides and tips during the migration process.

**Email Transfers:**
– Depending on how you manage your emails, you can manually transfer mailboxes to SunServer via an email client (e.g., Outlook, Thunderbird) or by using the built-in restore option in cPanel webmail (e.g., Horde or RoundCube).

**Post-Transfer Actions:**
– After the transfer, you can check your site from the new server using methods like modifying your local hosts file, creating a subdomain, or using online tools to ensure everything works as intended.

– To avoid downtime during DNS propagation, your account with your previous host should remain active until DNS propagation is complete, which usually takes 24-48 hours.

We’re committed to making your hosting migration a smooth experience, so don’t hesitate to reach out if you need assistance or have questions about the process.

What happens after I purchase web hosting?

We want to extend our congratulations on the launch of your new online business and express our gratitude for choosing SunServer services.

Upon receiving confirmation of your successful order, it will take approximately 30 to 60 minutes for your shared hosting package to become active.

Please note that with SunServer, you have the convenience of logging into your Hosting account directly through the SunServer platform. This means you won’t need to remember separate cPanel login details; remembering your SunServer account credentials will suffice.

Once your Shared Hosting account is activated, you’ll find cPanel auto-login buttons within your Account Panel.

After activation, our system will send an email containing your Hosting Account Details, including all the necessary login information, to your designated contact email address. Please be sure to check your Spam/Junk folders as well. If you haven’t received the Welcome email after some time, don’t hesitate to contact our Live Chat support, and we’ll be happy to resend it to you.

Below, you can reference an example of a Hosting Welcome Guide. The Hosting package details section provides you with essential information related to your newly acquired hosting service:

The cPanel details section includes the links and login details for accessing cPanel. As mentioned earlier, you can also log in directly from the SunServer Dashboard, eliminating the need to remember separate cPanel login information.

If your domain name isn’t yet pointed to our hosting nameservers, you can access cPanel through the SunServer Dashboard, similar to the process described here. Alternatively, you can use the server link, such as “https://sunserver.in/cpanel,” to access your cPanel control panel.

Note 1: When copying and pasting your login details, ensure there are no extra spaces.

Note 2: You can change your password to a personalized one by using the “Password and Security” menu in cPanel.

Once you’re inside your cPanel account, you’re all set to start working on your website. SunServer provides a user-friendly script installer called “Softaculous,” which includes popular software like WordPress, Joomla, and Magento, making installations a breeze.

Additionally, you can explore our Website Builder cPanel tool, allowing you to create a website effortlessly with a drag-and-drop editor.

What is an Outlet (Clearance) Dedicated server?

What exactly is an Outlet Server?

Outlet Servers are previously-used generation servers offered at a discounted price. Since the hardware has already been fully paid for, Outlet Servers present an economically and environmentally advantageous solution. These servers are robust and well-equipped, located in the PhoenixNAP datacenter. They come with set configurations, allowing you to choose your preferred operating system, web panel, and billing platforms. It’s important to note that Outlet Servers do not come with a 100% uptime guarantee due to their prior usage.

What does User-Responsible Server Management refer to?

User-Responsible Server Management, as the name suggests, places the responsibility for managing a server squarely on the user. This means that users are expected to have a solid understanding of Linux and command-line operations to ensure the server functions correctly. The responsibilities under this management type typically include:

1. Initial server setup and configuration
2. Detection and resolution of hardware issues
3. Server reboot (upon request)
4. Full root access

What type of Server Management applies to Outlet Servers?

Outlet Servers are only available with User-Responsible Server Management. This means that users are required to take on all aspects of managing these servers themselves, except in the case of hardware replacement where some support may be provided.

How do I know my Outlet Server is in operating condition?

All our Outlet Servers are rigorously tested to ensure they are in perfect working order. However, like any older servers, occasional malfunctions can occur. In the unlikely event of such issues, we are more than willing to offer a replacement for any affected parts or the entire server.

If you’re not entirely satisfied with your Outlet Server, you have the option to cancel and receive a refund (excluding license costs) within one week from the initial delivery date.